


Set Up
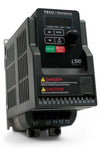
WHTP203v Commercial Thermal Printer
Download the driver to begin set up of your thermal printer.
Step 1: Setup & Calibration
The paper size may not be set correctly when switching to different label sizes.
- Windows: Go to Printing Preferences → Page Setup. Under Stock Name, select the correct label size.
- Mac: Go to Printers & Scanners and select the correct label size from the drop-down menu. The default label size is 4x6in.
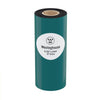
- Make sure you are using Direct Thermal Labels. This model does not support Thermal Transfer Labels.
- Check that the labels are loaded correctly (sticker side facing up, backing facing down).
Adjust the label size settings in your shipping platform (eBay, Amazon, UPS, etc.) to match the label size (e.g., 4 x 6 in.).
- Clear the Printer Queue
- Type Printer in the Windows search bar.
- Select "Printers & Scanners," then locate the WHTP203v.
- Select Open Queue, go to the Printer tab, then choose Cancel All Documents.
- Change the Printer Port
- In Printers & Scanners, select WHTP203v → Manage → Printer Properties → Ports.
- Select the correct USB port. If more than one is listed, choose the one with the highest number (e.g., USB003).
- Confirm the printer is powered on and the LED light is on.
- Check that the USB and power cables are securely connected.
Some antivirus or firewall software may flag the driver as a potential risk. The drivers for the WHTP203v have been tested and verified as safe.
Most direct thermal labels are supported. Some proprietary brands may not be compatible. For example, Dymo brand labels are only supported on Dymo printers.
- Clean the printhead and platen roller (also known as the rubber roller) inside the printer.
- Make sure the roller is clean and undamaged.
- Use PDF files instead of PNG or JPG formats.
- If unclear, adjust the printing density/darkness and print speed.
- Clean the printhead regularly to remove carbon buildup.
- Use PDF files instead of PNG or JPG formats.
- If unclear, adjust the printing density/darkness and print speed.
- Clean the printhead regularly to remove carbon buildup.
Windows: Open Printers & Scanners.
- Select WHTP203v → Manage → Printing Preferences.
- Under Print Density, adjust from 1 (lightest) to 15 (darkest).
- Under Options, adjust Print Speed as needed.
Mac: Open Printing Preferences → Page Setup.
- Under Options, adjust Printer Density (higher numbers = darker print).
- Under Options, adjust Print Speed as needed.
Need Assistance?
Need remote support? Click below to get access to TeamViewer remote support.